谷歌无线邮箱

谷歌 Gmail 邮箱地址的变体用法

方法示例是否等效说明
点号 (.)john.doe@gmail.com✅ 是任意位置加点
加号 (+)johndoe+tag@gmail.com✅ 是常用于分类邮件
googlemail 域johndoe@googlemail.com✅ 是同步到主邮箱
混合使用john.doe+test@googlemail.com✅ 是组合用法

主邮箱示例

假设主邮箱为:johndoe@gmail.com
上述所有变体地址收到的邮件都会自动送达此主邮箱收件箱。

自动管理docker容器更新的工具Watchtower让docker容器

基础运行模式

docker run -d \
  --name watchtower \
  --restart unless-stopped \
  -v /var/run/docker.sock:/var/run/docker.sock \
  containrrr/watchtower

指定容器更新

docker run -d \
  --name watchtower \
  --restart unless-stopped \
  -v /var/run/docker.sock:/var/run/docker.sock \
  containrrr/watchtower \
  lobe-chat nginx
Continue reading “自动管理docker容器更新的工具Watchtower让docker容器”

Easy Fix: This PC can’t run Windows 11 (Bypass TPM and Secure Boot)

how to fix the error This PC can’t run Windows 11 with the easiest method possible of bypassing the TPM and Secure Boot checks in the Windows 11 setup.

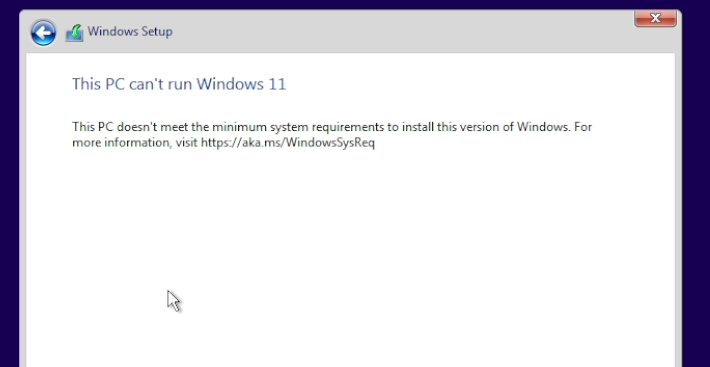
Normally, when you try to install Windows 11 on an unsupported machine, you will receive the following error, which is This PC can’t run Windows 11. This won’t allow you to continue with the setup and the only option would be to cancel the setup.


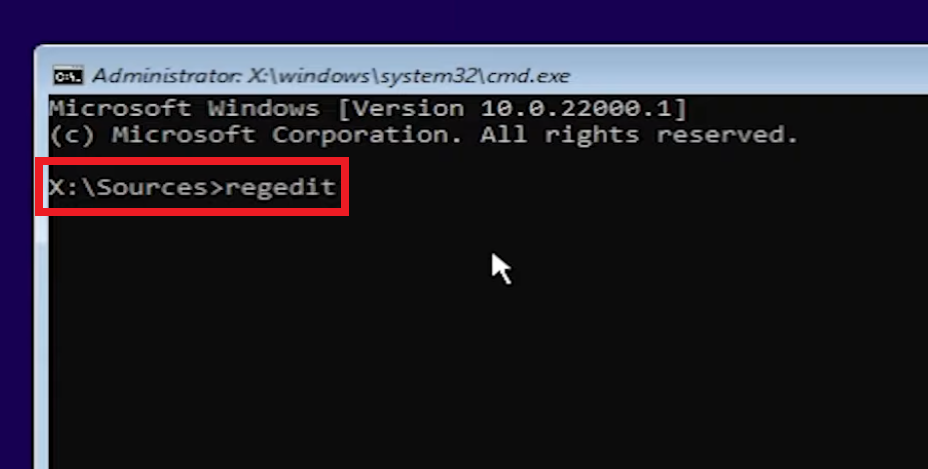
To bypass this, in the easiest method possible, just go back to where the setup let’s you click on the back button.

Press the keyboard combination Shift+F10 to open the command prompt in the Windows 11 setup. In the command prompt type regedit, to open the Registry Editor.

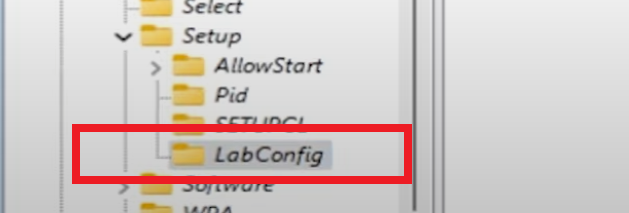
In the Registry Editor, go to the following location:

HKEY_LOCAL_MACHINE - SYSTEM - Setup

Right click on Setup and then click on New and then Key. Name the new key, LabConfig.

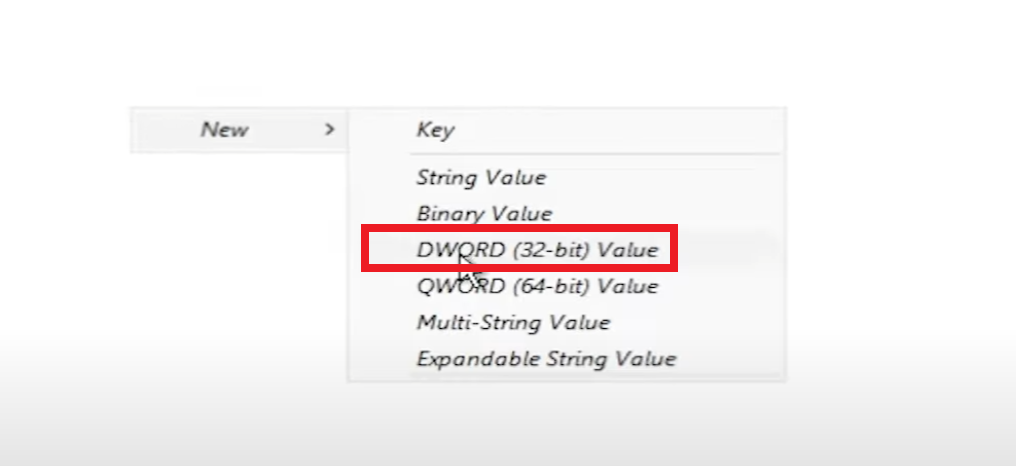
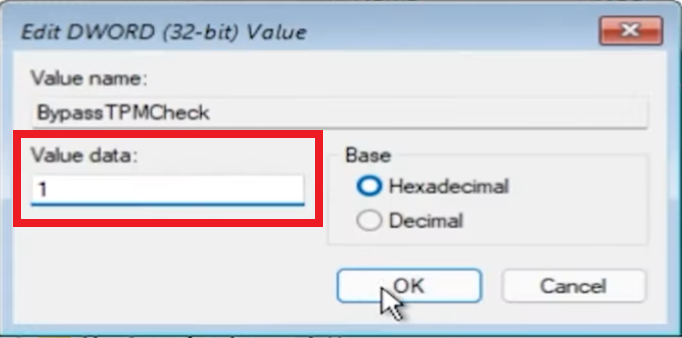
Double click on LabConfig, and then right click in an empty space, New and then DWORD (32-bit) Value.

Create 2 new values, named BypassTPMCheck and the other one BypassSecureBootCheck.

Double click on each value, and then change their value data to 1.

You can now close every window and continue with the Windows 11 setup. The installer will be the same, but you won’t be bothered by any other errors.

Speedup Stable diffusion model Loading time

A1111 Webui

webui-user.bat
set COMMANDLINE_ARGS= --xformers --no-hashing --opt-channelslast --no-download-sd-model --lowram
set SAFETENSORS_FAST_GPU=1

stable-diffusion-webui/modules/sd_models.py
Switch
pl_sd = safetensors.torch.load_file(checkpoint_file, device=device)
by
pl_sd = safetensors.torch.load(open(checkpoint_file, 'rb').read())

pl_sd = safetensors.torch.load(open(checkpoint_file, 'rb').read())
pl_sd = {k: v.to(device) for k, v in pl_sd.items()}

Comfyui

Comfyui/Comfyui/comfy/utils.pyreplacing
sd = safetensors.torch.load_file(ckpt, device=device.type)
by
sd = safetensors.torch.load(open(ckpt, 'rb').read())

It will increased the speed from the HDD x6 times, from 15M/s to 200MB/s

Google Gemma

Download ollama Client: 【Click Here

普通7B版 安装指令:(适合8G显存)

ollama run gemma:7b

如果你是第一次部署,它会自动下载!

7B的全量版本:(需要16G左右的显存)

ollama run gemma:7b-instruct-fp16

2B轻量版:(适合CPU会低配电脑安装)

ollama run gemma:2b

ModelParametersSizeDownload
Llama 27B3.8GBollama run llama2
Mistral7B4.1GBollama run mistral
Dolphin Phi2.7B1.6GBollama run dolphin-phi
Phi-22.7B1.7GBollama run phi
Neural Chat7B4.1GBollama run neural-chat
Starling7B4.1GBollama run starling-lm
Code Llama7B3.8GBollama run codellama
Llama 2 Uncensored7B3.8GBollama run llama2-uncensored
Llama 2 13B13B7.3GBollama run llama2:13b
Llama 2 70B70B39GBollama run llama2:70b
Orca Mini3B1.9GBollama run orca-mini
Vicuna7B3.8GBollama run vicuna
LLaVA7B4.5GBollama run llava
Gemma2B1.4GBollama run gemma:2b
Gemma7B4.8GBollama run gemma:7b

huggingFace

https://huggingface.co/chat

Setting custom filenames in Stable Diffusion – Comfyui and Automatic1111 webui

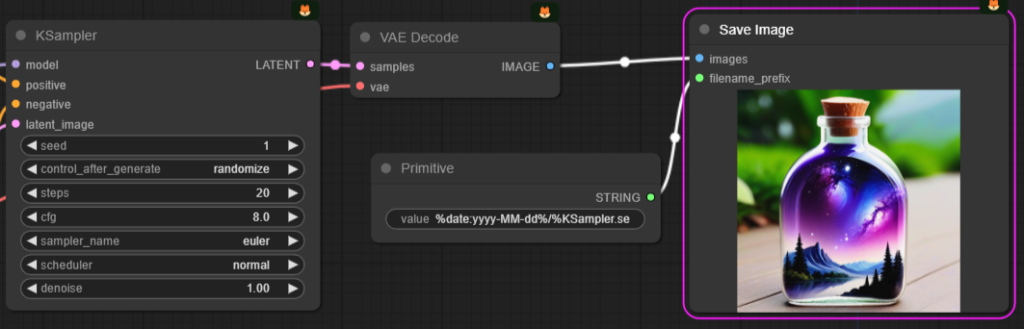
The Stable Diffusion ComfyUI is a powerful GUI for AI image generation, but it’s also known for its limited documentation and steep learning curve for automatic1111 users.

By default, ComfyUI generated images will be dumped in the output folder with the meaningless filename ComfyUI_00001_.png with increasing numbers.

Continue reading “Setting custom filenames in Stable Diffusion – Comfyui and Automatic1111 webui”

ComfyUI shortcuts – speed up your workflow:

ShortcutExplanation
Ctrl+EnterQueue up current graph for generation
Ctrl+Shift+EnterQueue up current graph as first for generation
Ctrl+SSave workflow
Ctrl+OLoad workflow
Ctrl+ASelect all nodes
Ctrl+MMute/unmute selected nodes
DelDelete selected nodes
BackspaceDelete selected nodes
Ctrl+DelDelete the current graph
Ctrl+BackspaceDelete the current graph
SpaceMove the canvas around when held and moving the cursor
Ctrl+Left ButtonAdd clicked node to selection
Shift+Left ButtonAdd clicked node to selection
Ctrl+CCopy selected nodes
Ctrl+VPaste selected nodes while severing connections
Ctrl+Shift+VPaste selected nodes while maintaining incoming connections
Shift+Left ButtonHold and drag to move multiple selected nodes at the same time
Ctrl+DLoad default graph
QToggle visibility of the queue
HToggle visibility of history
RRefresh graph
2 X Left ButtonDouble click to open node quick search palette
Right ButtonOpen node menu

Keyboard shortcuts for Windows 10 and 11

Most users are familiar with using their computer with a keyboard and mouse. After all, this is the most intuitive method for most people. The mouse makes it easy to know what you’re pointing at, selecting, and clicking, so even first-timers don’t take too long to get the hang of it. But for proficient users, the keyboard can be a much more powerful tool, and it allows you to get things done faster. That’s why there are a ton of keyboard shortcuts in Windows 11 that help with exactly that, and we’ve compiled a list of them to help you out.

Continue reading “Keyboard shortcuts for Windows 10 and 11”