Openwrt Overlay 扩容

Overlay 文件系统

Overlay 文件系统
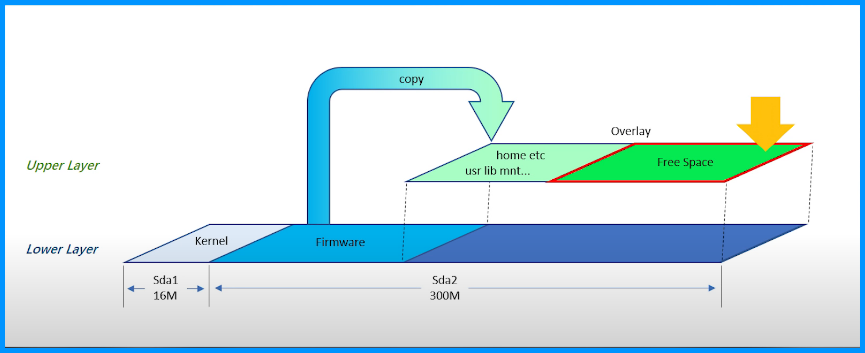
  • Lower Layer 为编译固件时分配的 只读 空间
    • sda1 为内核分区
    • sda2 为固件分区
  • Upper Layer 即为 Overlay 分区 可读写

举个例子:
例如,open­wrt 的固件分区为 16MB + 300MB 在系统启动时,会将 Firmware 部分拷贝到 Over­lay 中
Over­lay 的空间使用的是 sda2 分区的剩余空间
假如 Firmware 的大小为 120MB,sda2 的实际使用空间为
120MB(Firmware)+ 120MB(Firmware 副本)
所以 sda2 实际使用空间则只剩余为 60MB

Overlay 文件系统

那么 Over­lay 给我带来的好处就是,Firmware 部分可以相当于一个系统备份,而我们所有的操作都是在 Over­lay 上面。同样,我们也可以随时进行系统恢复。

由上可以看出,Over­lay 的弊端就是会占用两倍的 Firmware 空间。
例如一台路由器的内存为 256MB,那么我们实际能使用的空间则仅剩大概 256MB – 120MB * 2,也就是 10MB 左右
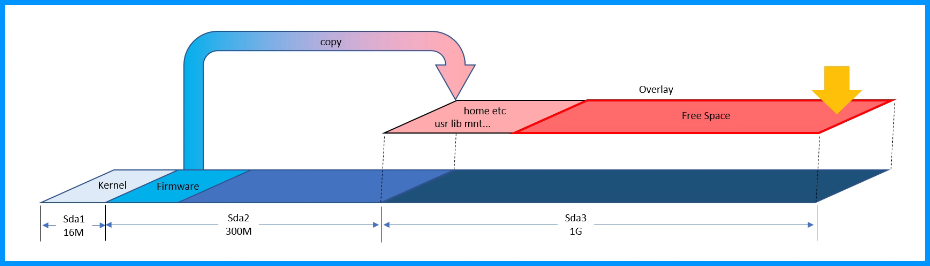
所以我们就需要将 Over­lay 的空间指向一个外部存储设备。

注意:只有 Squash 格式的固件支持 Overlay,etx4 格式的固件不支持


Continue reading “Openwrt Overlay 扩容”

How to Stop and uninstall Synology Active Insight & Hybrid Share.

Following Steps can help you stop then uninstall the Active Insight & Hybrid Share.

  1. Go to Control Panel and in the Services section open up the Task Scheduler.
  2. Click Create > Trigerred Task > User-defined Script.
  3. Name that task however you want, e.g. “Remove ActiveInsight on boot”.
  4. Select root as the user and Boot-Up as the event.
  5. Move over the Task Settings and in the User-defined script paste the following: synopkg stop ActiveInsight && synopkg uninstall ActiveInsight then click OK.
  6. You can now select your task in the task list and execute it manually with a click on Run. Shortly after, Active Insight should be gone from your packages.

This will ensure that every time your synology server starts up, the super admin (root) will automatically attempt to remove Active Insight. Since Active Insight should only come back with future software updates, which require a reboot to complete, this task will only run when necessary (or anytime you manually reboot your server).

Same as the steps above to get rid of Hybrid Share with the following commands: synopkg stop HybridShare && synopkg uninstall HybridShare

SSL certificate renewal and deployment via acme.sh for Synology DSM

How to Configure HTTPS on Synology NAS Using Let's Encrypt - YouTube
  • Synology NAS ( I have DS1817+ running DSM 7.11, anything above 6.2 should be ok) + your own domain ( I will use mydomain.com in this post)
  • Have Cloudflare set up for acme authentication ( Step 3 and 4 from this guide ) and have your Cloudflare API Token follow step 1 or Global API Key (This is possible with other DNS providers, you’ll need Email and Token https://github.com/acmesh-official/acme.sh)
  • You will need to have a folder on your NAS for acme.sh and know a path to it (e.g I have a share called “Certs” and in there I have a folder acme.sh so the full path is /volume1/Certs/acme.sh)
  • This one is not really important, I just like to have a separate admin user, as you will have to use admin user/pwd and cookie combination to deploy the cert.
Continue reading “SSL certificate renewal and deployment via acme.sh for Synology DSM”

How to enable windows power mode

How to change Power Mode in Windows 11/10

How To Enable Missing High Performance Plan Ultimate Performance Power Plan Windows 10. to give an extra boost to high-power systems (think workstations and servers) by optimizing the High-Performance power plan. It’s geared toward reducing or eliminating micro-latencies associated with fine-grained power management techniques. Microsoft has added an “Ultimate Performance” power scheme to Windows 10 April 2018 Update. It’s built upon the High-Performance power

Ultimate Performance:
powercfg -duplicatescheme e9a42b02-d5df-448d-aa00-03f14749eb61

High Performance:
powercfg -duplicatescheme 8c5e7fda-e8bf-4a96-9a85-a6e23a8c635c

Balanced:
powercfg -duplicatescheme 381b4222-f694-41f0-9685-ff5bb260df2e

Power saver:
powercfg -duplicatescheme a1841308-3541-4fab-bc81-f71556f20b4a